1

Raw Rosewater Pistachio Cookies

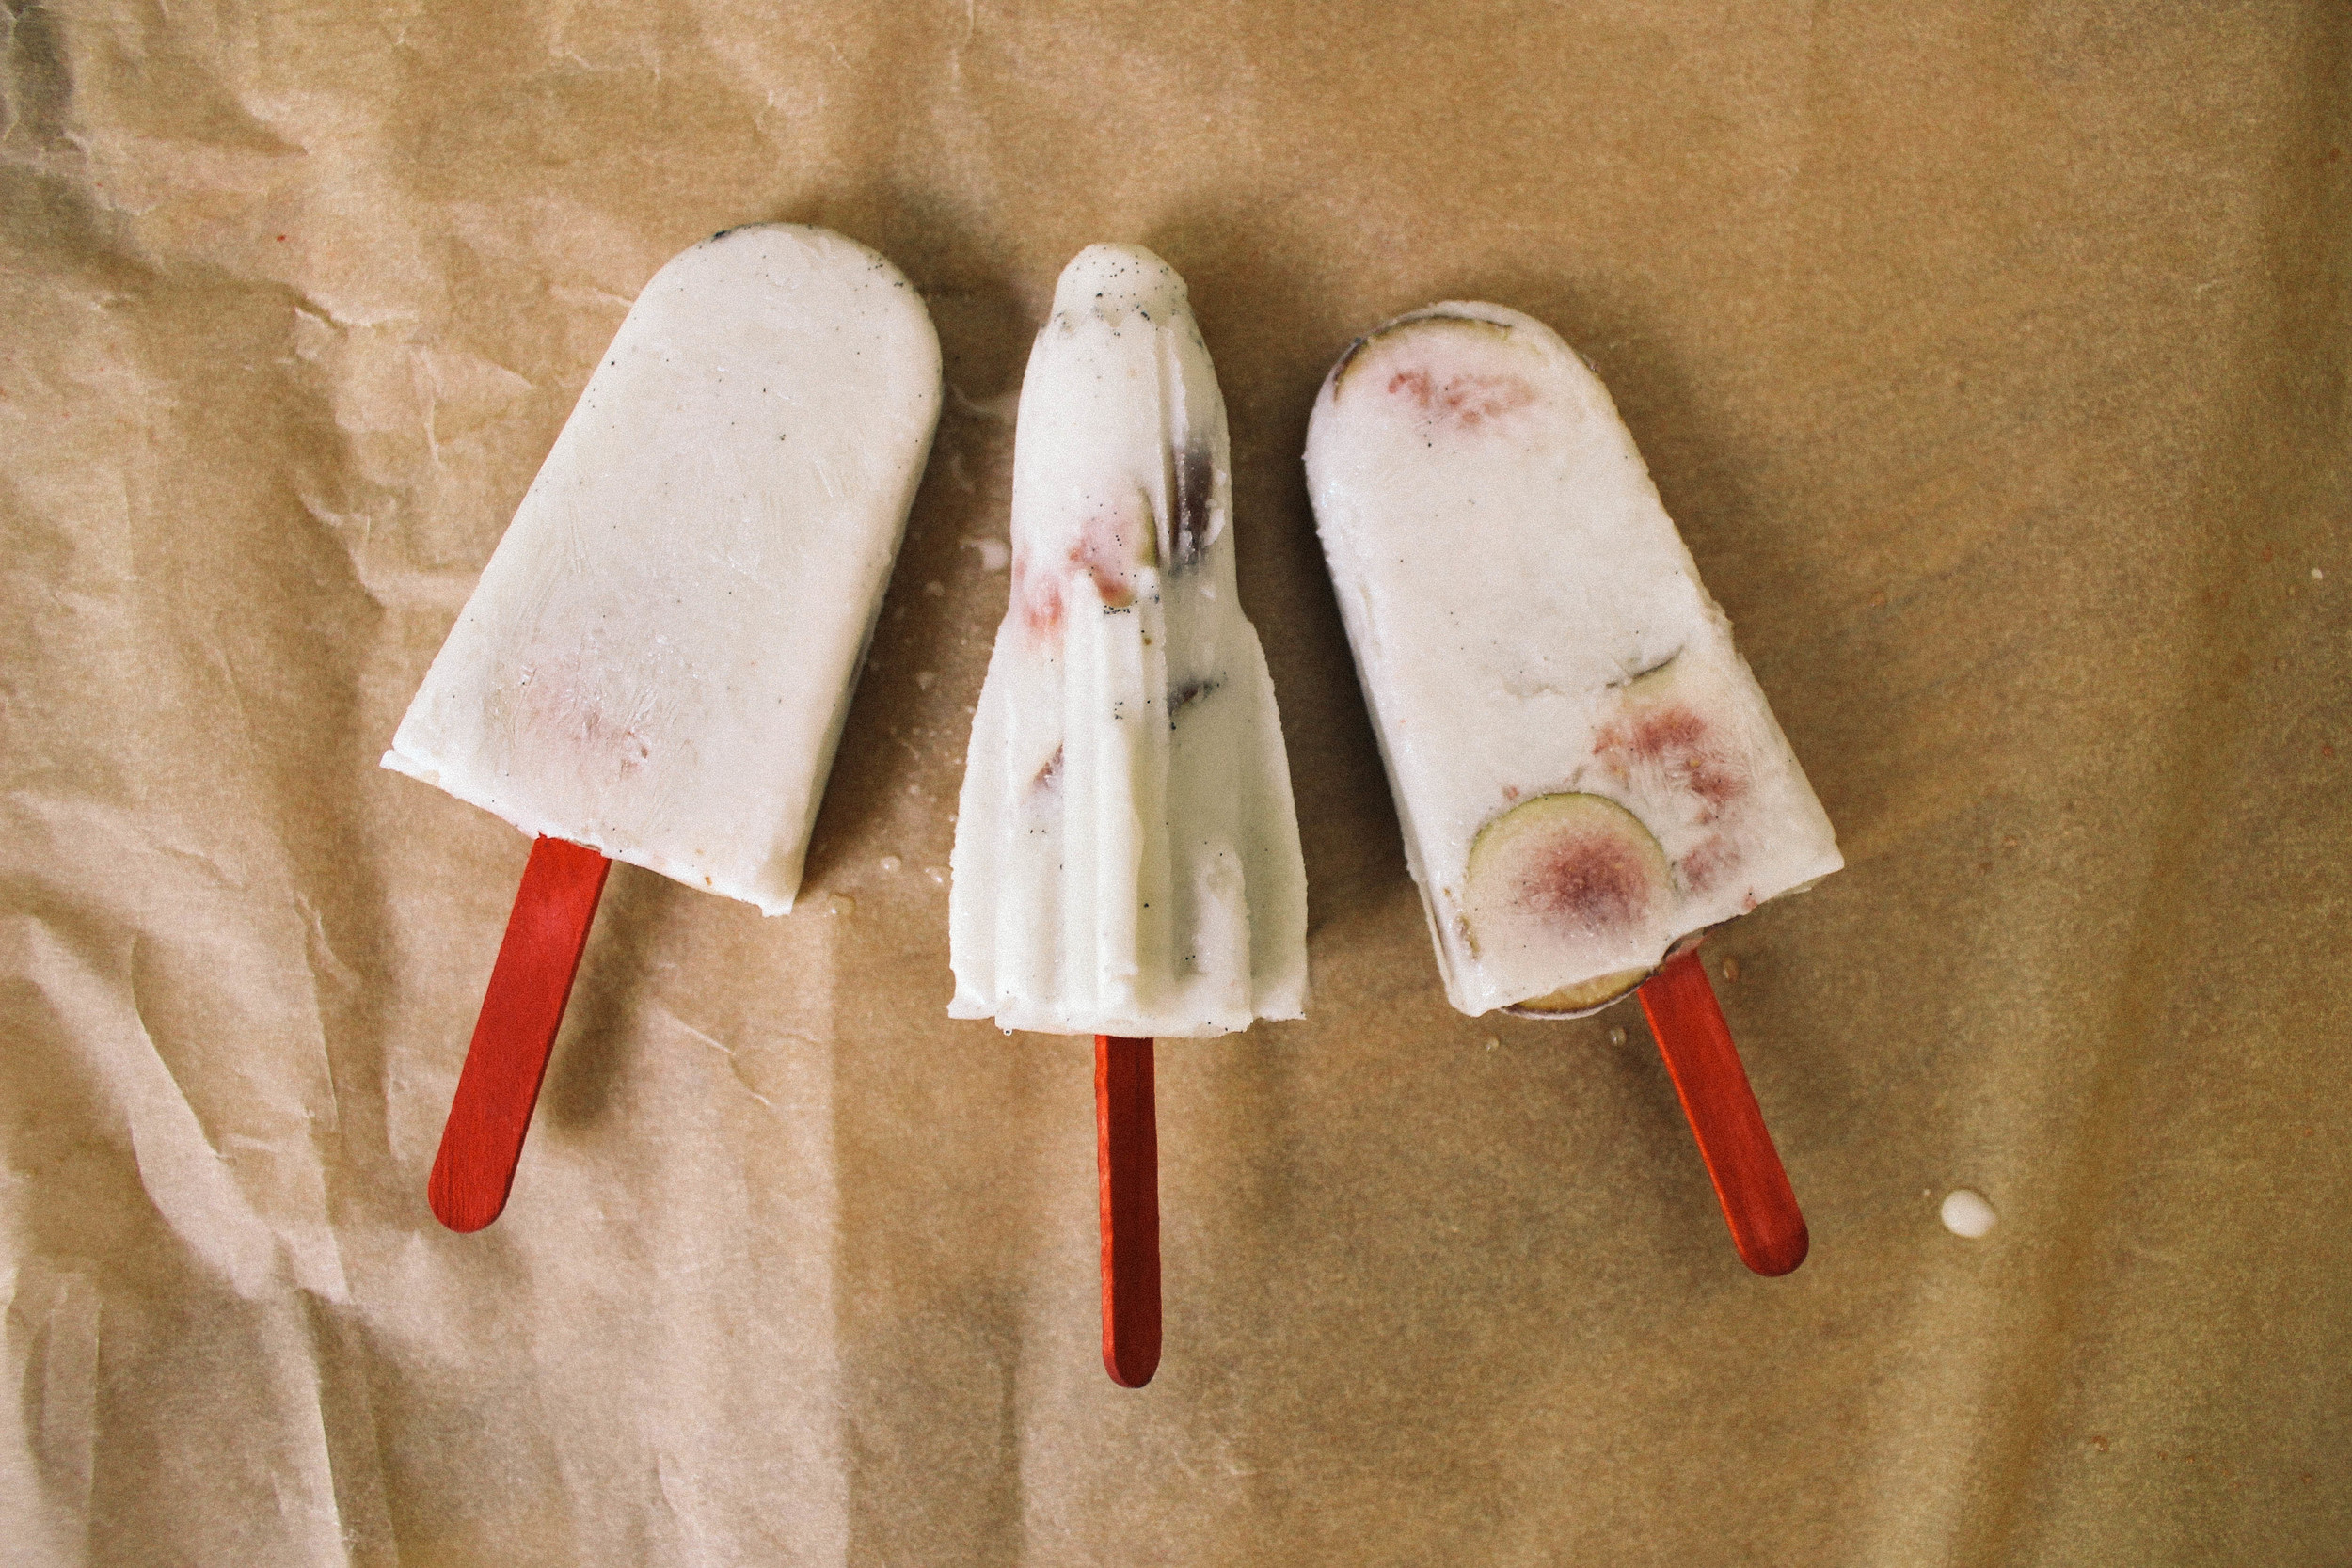
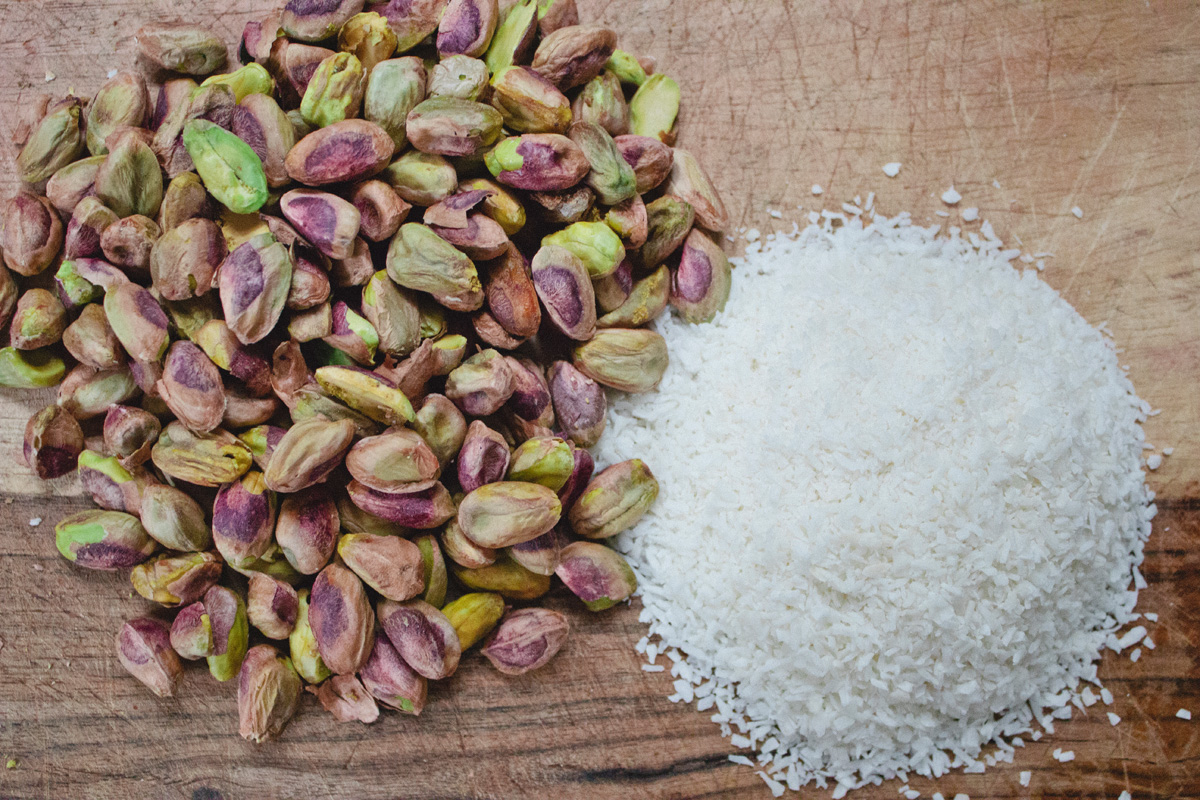
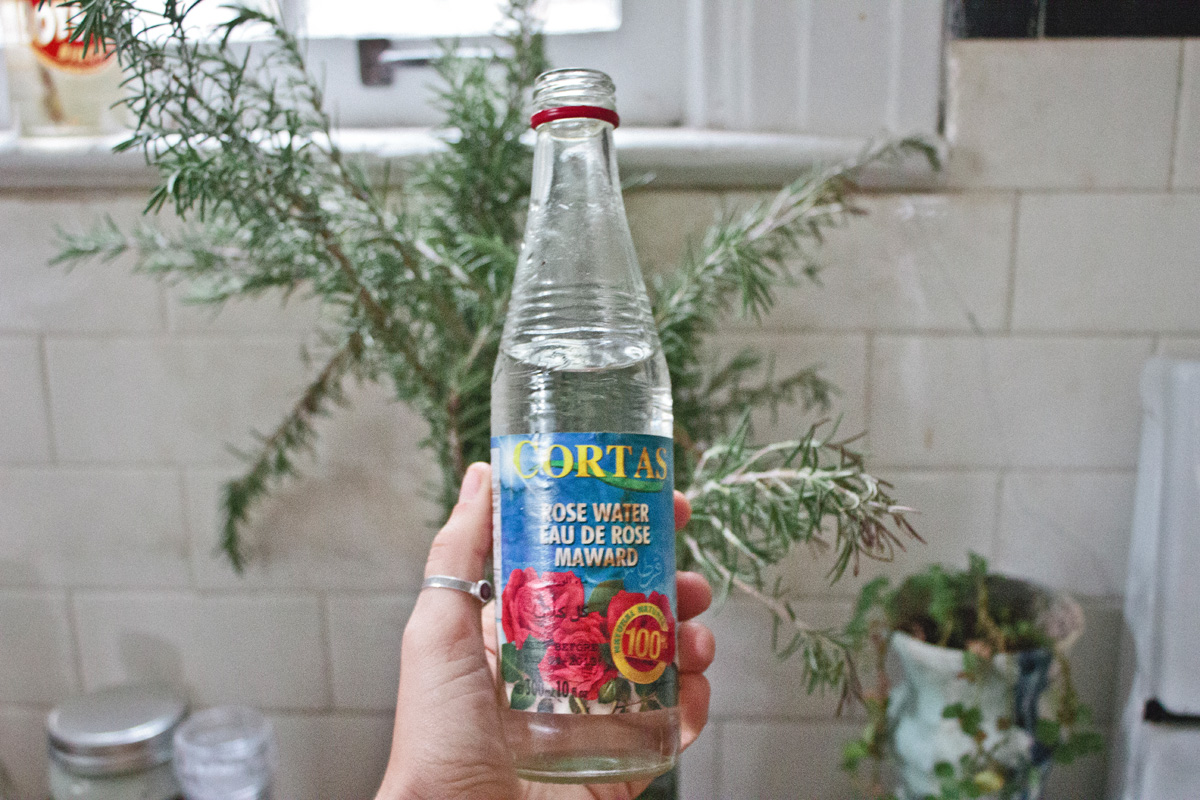
Magical flavor combo makin' my mouth water just from posting these pics. Rosewater is great for skin health, pistachios are great for heart health, and you've already heard us preach on coconut and honey. Raw = maximum nutrition ingestion. E, what am I missin? Aside from one of these cookies of course.....


Ingredients:

2 cups raw shelled pistachios
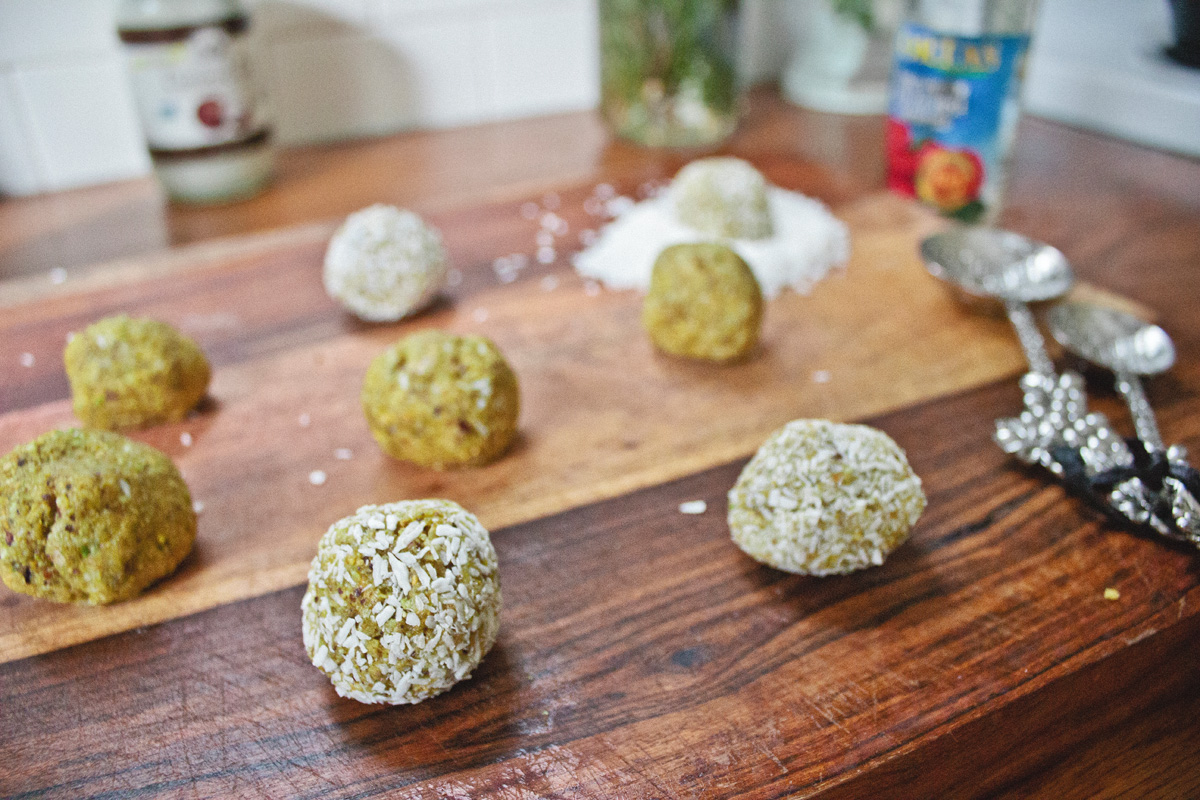
4 tablespoons unsweetened shredded coconut + more for garnishing
3 tablespoons pure rosewater
1/2 cup extra virgin coconut oil melted
1/3 cup 100% pure Grade B maple syrup  or local raw honey
1 pinch of unrefined salt

Method:

1. Grind pistachios in a food processor until ground into a flour. 

2. Add other ingredients, blend until well integrated and refrigerate for flavors to intensify and mixture to harden.

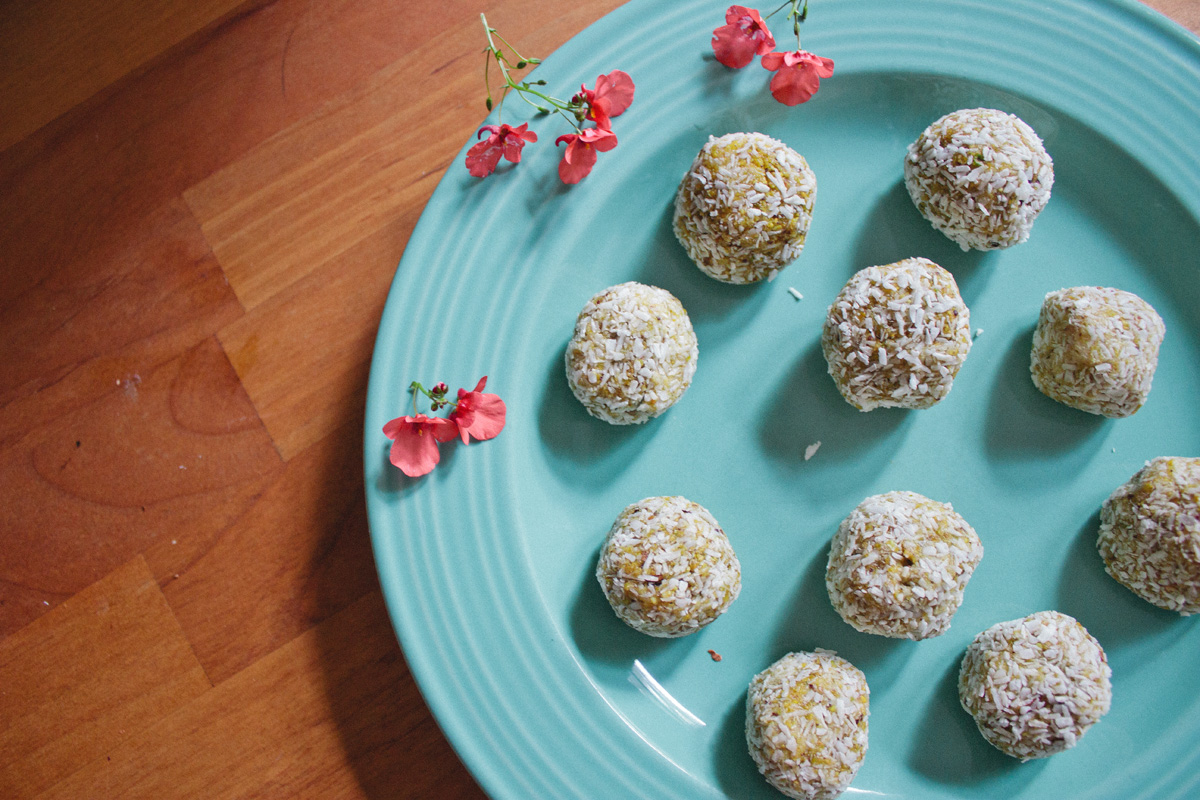
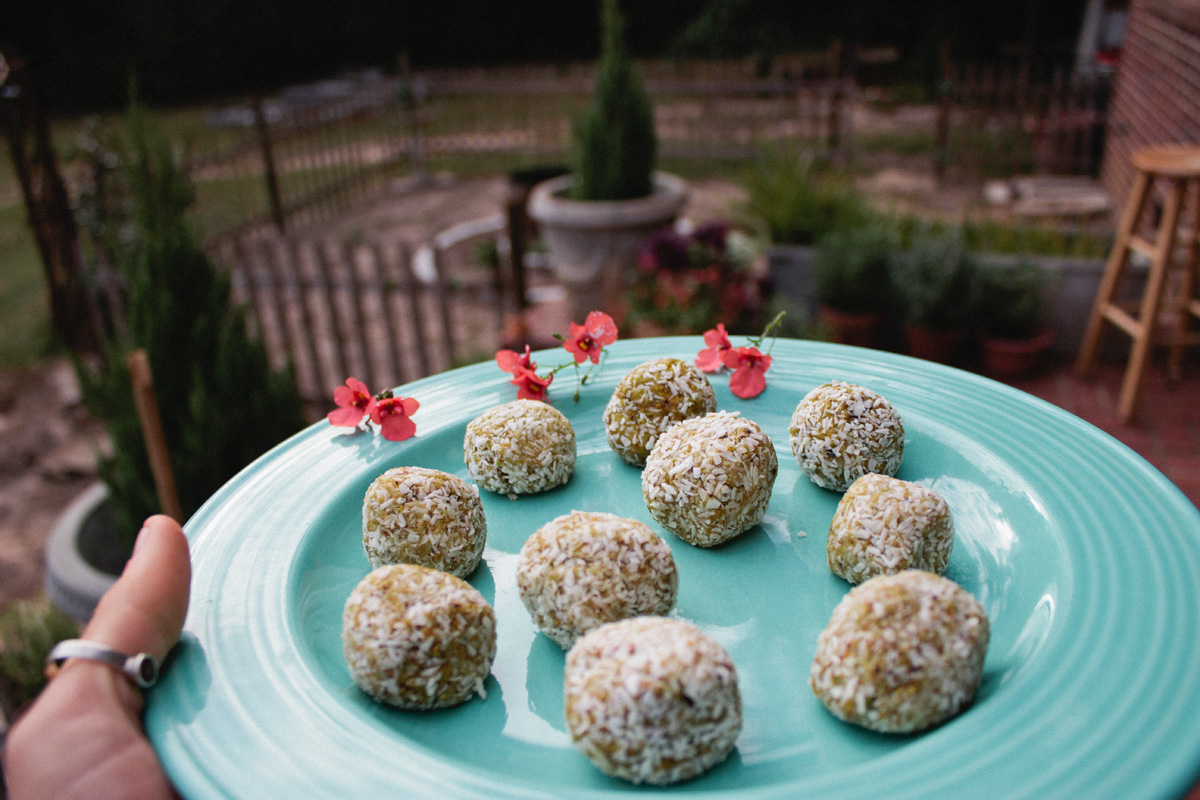
3. Take 1 tablespoon of the mixture at a time and roll into a round ball topped with the leftover coconut flour. You can shape into flattened out cookies or round balls. Arrange on serving platter, add back to fridge to set, and serve with your favorite tea or just nom your way through an afternoon pick me up.

Pickle Me Pink

Our weekly loot from Ten-Speed Greens this month has provided the prettiest rainbow chard and watermelon radishes.  We decided to throw these beauts in a quick pickle brine, allowing their vanity to flourish and our taste buds to celebrate. The bright pink has sorta settled over everything in the jar, giving the pickles a real gorgeous color. 

Pickling is great for veggies you can already enjoy raw, and the specific flavors of chard and radish (with the red onion and garlic we threw in) is like a serious smack-down on your average cucumber. Plus this takes our pickle-backs to like next level status.

Pickle brine is super easy to make, with the pretext of equal parts water and vinegar. We used apple cider vinegar and a bit of white wine for extra sweetness. Its nice to play around with different herbs and spices. We let the veggies do the talking and kept our recipe simple. 

These pickles are ready to enjoy in about 24 hours and should last at most a month, assuming you don't eat em all at once.


Ingredients:

1 cup white wine
1 cup apple cider vinegar
1 cup water
garlic cloves, thinly sliced
1 tablespoon kosher salt
2 teaspoons granulated sugar
The stems from one bunch rainbow chard
1 bunch of watermelon radishes sliced crosswise
1
 small red onion, thinly sliced crosswise

Method:

1. Chop veggies, add veggies to an open face jar
2. Mix sugar salt, white wine, acv and water
3. Pour over veggies
4. Refrigerate for 24 hours.

Spiced Apple & Caramelized Fennel Whole Wheat Biscuits

Warm buttery biscuits often goes over-looked, especially when half your friends are gluten free and carb consumption is limited to bananas and beer. But when that perfectly appropriate time does come for homemade cornbread, biscuits, dinner rolls, and other glutinously delectable variations, who can really complain?

These biscuits deviated pretty much entirely from this recipe (how good does that sound?!) but nevertheless were a success. With leftover fennel hanging around, fresh picked mountain apples, and the perfect excuse to use seasonal spices, this random combination of ingredients resulted in a next-level flavor combo.

Honestly, you could get away with pretty much any bread variation for this recipe, but it was breakfast when I served those so made sense for biscuits.


Ingredients:

2 cups whole wheat flour (set a cup or so aside for when rolling out the dough)
1 tbsp baking powder
1 pinch of fine sea salt
Cinnamon, nutmeg, and any other spiced seasoning of choice
3/4 cup liquid coconut oil.
1/2 cup of organic honey
2 tbsp of brown sugar
2 eggs
A dribble of warm water or milk of choice
1 tbsp vanilla extract
1 to 2 cups of peeled apples
1 whole fennel (you can choose to use the whole vegetable, I only used the bulb).


Method:

For the spiced apples: Preheat the over to 400 degree F
1. Peel the apples, then cut into thin slices. Toss them in with 1/3 of the coconut oil, spices, and the brown sugar.
2. Line a baking sheet with parchment paper and pop in the oven for about 10 minutes.
3. Remove from the oven and save the parchment paper!

For the fennel:
1. I used the bulb for this, but you can use whatever part of the fennel you want. The bulb caramelizes better though. If you choose to use that, go ahead and chop it up into small sized chunks. 
2. Add a few tbsp of the coconut oil to the pain, or just enough to reach all the fennel.
3. Toss the fennel in and cook until caramelized.
* In this step you can chose to further season the fennel with sugar, a bit of sea salt, honey, or anything else really. I used a bit of brown sugar with the coconut oil.
4. When done remove to cool.

For the biscuits: Preheat the oven to 400 degrees F
1. Add together the flour, baking powder, salt and spices.
2. Pour in the remainder of the coconut oil, your honey, and vanilla extract.
3. Gently whisk the eggs and milk choice together, then add the caramelized fennel, and THEN add into your mixture.
4. Fold all ingredients in together so that they've absorbed into the flour.
5. Roll out the dough and then cut with a round biscuit cutter. Use extra flour if needed. Because you will be stuffing the biscuits with your now tender spiced apples, try and be weary of the size you cut the rounds.
6. Once you have your biscuits cut out, place an apple slice in the center of each, and then fold around so that it (mostly) covers the center. 
7. Finish stuffing the biscuits, then place on top of your parchment paper you used earlier for the apples. The paper should still be sugary moist from the coconut oil and sugar. 
8. Pop in the oven for about 15 to 20 minutes, or until cooked.

Take out, smother in buttah, and enjoy!

Turnip the Beetza' with Fennel & Honey Cashew Cream

SPOILER ALERT: We won for our category!! Victory never tasted so savory. Congrats to the other winners, competitors, and big thanks to Ten-Speed Greens and our super profesh judges.

Ten-Speed Greens recently hosted their November pie contest, and with little to no mental effort we thought to attend as competitors. The categories were sweet and savory, and the opposition was fierce. Having recently proclaimed our love for Ten-Speed (plus the added incentive of getting to eat a lot of delicious pie without shame or the pain of a recent break-up) there was no way we were missin' this.

After serious deliberation (and looking at a lot of late-night pie pix), we finally decided on a savory pie recipe. Icing (cream?) on the pie, we were going to use part of our Ten-Speed CSA for the ingredients. A scallion cauliflower crust, kale pesto base, roasted veggies on top, with thick dollops of fennel and honey cashew cream. Noms. So not only did the pie sound good, have local ingredients, but it tasted alright too. 

Each step is pretty easy, none of the recipes call for unfamiliar ingredients. Plus we luuuuv cauliflower so why bother with a conventional crust? The scallions, turnips, and mustards came from our CSA. Of course using fresh produce is like, well duh, especially since this pie isn't too heavy and uses minimal seasoning. But two pro tips to be aware of: the last step of poppin' the pie back in the oven for about 10 minutes is crucial to ensure extra crispiness, especially since the crust only continues to moisten with the pesto; find that perfect balance of seasoning, it can be easy to too heavily season each component (because it tastes good) but then when you have finished layering your pie, it might taste like a someone poured a jar of salt in your mouth.


Ingredients:

for the crust:
3 C. mixed cauliflower (about 1 small head or ½ large head)
¾ C. almond flour or coconut flour
1 bunch of scallions
Salt & pepper to taste
2 eggs or
3 flax "eggs" (1 egg = 1 Tbsp. flaxseed meal and 3 Tbsp. water, so 3 Tbsp. flaxseed meal and 9 Tbsp. water)
* If you've got some nooch layin around, might as well add some to the crust!

for the pizza pie:
Beets
White turnips
Red onions
1 bunch of leafy greens,
we used mustard greens

3-4 thyme sprigs
Kale pesto*
Cashew cream*

for the kale pesto:
6 cups chopped kale
1/2 cup olive oil
1 tablespoon minced garlic
1 cup pine nuts
1 heaped teaspoon lemon zest
1 tablespoon lemon juice
salt & pepper to taste

for the cashew cream:
1 cup of cashews (soaked overnight)
water (so it just slightly covers the cashews)
2 tbsp of raw honey
1 to 2 tbsp of fennel seeds


Method:

1. Preheat oven to 400 degrees and line a baking sheet with parchment paper.
2. We used 2 real eggs as a binder, but to make the flax "eggs", mixing 3 Tbsp. flaxseed meal with 9 Tbsp water and set aside.
3. 
While the flax eggs are processing, wash the cauliflower and place in a food processor or blender. Chop until it reaches a rice-like consistency.
6. 
Finely chop scallions.
7. Place the cauliflower, almond flour, scallions, salt, pepper (and any other seasonings to taste) in a large bowl and mix well.
8. Add your 2 eggs now, or the flax eggs, to the dry mixture and combine until well blended. Add olive oil if the crust isn't moist enough. Form the dough into a ball.
9. 
Place the dough in the center of the lined pie panned and, using clean hands, flatten the dough to about ½ inch thickness, leaving the edges a bit thicker.
10. S
lice beets, onions, and turnips and then coat the veggies in olive oil and thyme.
11. Place the vegetables and crust in the oven, and cook for about 20 minutes.
12. While this is baking, prepare your kale pesto and cashew cream. Both require simply mixing, in the food processor and high speed blender, respectively. 

13. When the crust and pizza pie toppings are ready brush your kale pesto on top as your first layer. Place the beets, turnips, onions, and now leafy greens on second, and then drizzle your cashew cream on top.
13. 
Bake for another 10 or so minutes at 400 degrees (unfortunately we ran out of time to complete this last step... but please don't make our mistake! This step is crucial to definitely have cooked crust).

Grandma's Granola

This isn’t my grandma’s granola recipe. This recipe was for my grandma, as gift for her birthday. Also in a way a gift to my grandpa- he can’t leave the breakfast table till his yogurt is gone, and he hates yogurt. But pouring this granola on it should alleviate some of the pain.

The good thing about good granola, is that there never necessarily has to be a rhyme or rhythm to what ingredients get thrown in. It’s easy to take the traditional route - nuts, dried berries, seeds, etc. Then of course there’s some cray flavor combos worth experimenting with- cacao, espresso, black cherries, balsamic vinegar, goji berries, other random delicious ingredients… And of course it’s always nice to be seasonal (pumpkin pie spice on everything?).  

Either way, everything tastes great when its drenched in sugar. I skipped conventional brown sugar and used raw honey instead. Lots of raw honey. That, with the coconut oil and almond butter keeps this granola batch really moist. Which is important because granola is easy to burn. The rest of the ingredients revolve around the “go big or go home” mantra, pouring in just about everything in the kitchen cupboard. 

I ran the dried fruits and 1/2 of the nuts through the food processor, but for a chunkier granola just chop to desired size. Also, be sure to use pitted dates! Obvious, but unfortunate if forgotten.

It’s good to keep an eye on your granola when its in the oven, mixing it around occasionally so that everything bakes evenly. For extra crispiness, either continue to bake on a lower temperature, or just take out and let sit overnight. When done, put in an airtight container. Then hide the container. Granola so good its hard to put down.


Ingredients:

1/2 cup coconut oil (some will be used to oil the pan)
3 cups rolled oats (be sure to soak overnight)
1 cup raw pumpkin seeds
1 cup raw coconut flakes
1/2 cup flax seeds
lots of shakes of cinnamon & nutmeg
1/2 cup (ore more) raw almond butter with maple
1/4 cup pistachios
2 cups pecans (love em)
1/2 cup dried apricots
4 of 5 dates
1/2 cup almonds
2 cups raw honey (sure that’s a lot, but its how I can get away with no sugar)

Method:

1. Preheat the oven to 400˚
2. Cut up the dried fruits, dates, and any larger nuts. Chop in larger chunks, or for more of a past throw in the food processor.
3. Combine the oats and flax seeds in a large mixing bowl.
4. Melt the coconut oil, and combine 1/4 with the oats.
5. Add in the honey, almond butter, and reaming ingredients. Combine with hands (the mixture is usually a bit tough, so this way usually is the easiest to evenly mix everything in).
6. Depending on desired moisture, add more honey if necessary. Or a dribble of almond milk.
7. Add in any whole nuts.
8. Oil your baking sheet with the remainder of your melted coconut oil.
9. Turn the oven down to 325˚, and bake granola for about 20 minutes. Be sure to keep an eye on it, mixing and turning over as necessary.

Garden Greens & Sweet Potato Soup

Soup is seriously one of the easiest, and most satisfying meals to make when the weather gets cold. Plus it acts as an impromptu hand warmer by way of mug. No disrespect to the wide array of canned or boxed soups, that you can pick up anywhere from the gas station to the grocery store. Using fresh ingredients, especially those picked from the garden just a few hours earlier, usually makes the meal worth the extra hours and work. Save the campbell's for desperate times.

This soup is easy, nothin' fancy, but tastes way too delicious. Way too delicious because of the incredibly fresh, crisp, and homegrown greens used in the recipe. The greens: kale, collards, and cabbage; plus hearty sweet potatoes make this soup heavy enough for winter nights and empty stomachs. A few other necessary ingredients to top it off, and everyone's happy!


Ingredients:

Greens: kale, collards, and cabbage. However much you'd like to use. I put about a 2 heads of each.
2 medium-sized organic sweet potatos
No-chicken vegetarian bullion (or real chicken bullion), amount dependent on how much water you use
2 small red onions
3 cloves of garlic
1 can crushed tomatoes 
1/2 cup of apple cider vinegar
1 tbsp organic coconut oil
Salt, pepper, other seasoning to taste

Method:

1. Dice the onions and garlic. Sauté in coconut oil. Cooking stirring for five to ten minutes. Use the pot you'll be cooking the soup in.
2. Once the onions and garlic are soft, add in your water and bullion. The amount of bullion is dependent on how many cups of water you use. Also add any extra seasoning.
3. After adding the water, throw in your cubed sweet potatoes. Keep the temp on high and allow the water to reach a boil. Once it has, turn it down to low and cover the pot.
4. After about 10 minutes (more or less), check to see that your sweet potatoes are tender. If so, throw in your greens and crushed tomatoes. 
5. Keeping the stove temp on low, place the lid back on the pot for about 5 to 7 minutes, or until the greens are soft. This will happen quickly so keep an eye out. Nobody wants mushy greens!

Sea Salt Honey Popcorn with Pumpkin Pie Spice

We've already proclaimed our love for popcorn- possibly the most mindless yet instantly satisfying snack attack out there. With fall flavors officially taking over our kitchens, we thought we'd upgrade our usual recipe with new fave pumpkin pie spice. This seasoning is a blend of cinnamon, ginger, nutmeg, allspice, and cloves, and goes just as well with dranks as it does food. The recipe is super simple, has mostly basic kitchen ingredients, and tastes pretty much like pumpkin pie- but with a lot less work.

pop.JPG

Ingredients: 

1/2 teaspoon coconut oil
5 tablespoons organic popcorn kernels
1 teaspoon sea salt
3 tablespoons organic honey
Several shakes of pumpkin pie spice seasoning

Both sea salt and honey can be added in proportions of preference


Method:

1. In a large stove-top pot, add coconut oil and heat over medium heat until it is completely melted.
2. Add in the popcorn kernels and salt. Cover completely with lid until you hear the kernels begin to pop. As soon as you do, remove the lid slightly to let out air pressure (or else your kernels will quickly burn).
3. When kernels are finished popping, pour into a large bowl.
4. Drizzle honey over the warm popcorn, then sprinkle with the pumpkin pie spice

Roasted Salt, Vinegar & Dill Chickpeas

 Sometimes we’ve just got to satisfy a craving for crunchy, salty foods. Our usual go-to is old school popcorn, popped in a pot. The amount of popcorn that we eat is almost borderline embarrassing.. but we couldn't probably survive on it alone. Roasted nuts tend to have the same effect. A great alternative that often gets overlooked for a bowl of hummus, is oven roasted chickpeas. Especially now that the temperatures are dropping and some nights all you want to do is cuddle up with a warm bowl of whatever snack what-have-you. This high protein, low fat, fiber filled snack will do just the trick to ease your conscience and get your crunchy fix. You can literally throw whatever combination of spices you’d like onto these guys, toss 'em into the oven for a short amount of time, and then, BLOOM, i mean, BOOM: you’ve made yourself a healthy and satisfying snack attack. 

Enjoy hot, or if you can manage not to eat them in one sitting (unlike us), store in a an air tight container. Like popcorn, the chickpeas are never as good the next day- they tend to loose crispy-ness after 24 hours.

We went with a salt, vinegar and dill recipe to thrill our taste buds. Why? Because we are suckers for VINEGAR EVERYTHING. Great way to get that salt and vinegar fix without chowing down on a bag of chips. Chickpeas will take on any flavor you give them so go on with yo bad self and get creative. Grab a bowl of roasted chickpeas the next time you’re on your way to watch Breaking Bad (RIP) or replace them with croutons and sprinkle on top of a salad. Oh and in all seriousness, we highly recommend having different options (sweet, spicy and savory) at disposal for your next happy hour.


Ingredients: 

2 cans of cooked organic chickpeas (drain & rinse)
2 tsps olive oil
1 tsp garlic salt
1/2 tsp pepper
1 tsp dill

Method: 

1. Preheat oven to 425 degrees F.

2. Drain the can of garbanzo beans in a strainer and rinse with water for a few seconds to clean off the beans. Shake and tap the strainer to rid of excess water. Pat dry with a towel.

3. Place on a baking sheet and drizzle with olive oil. Toss with all your spices so they are well coated. Make sure chickpeas are in a single layer. Bake for 15 minutes, toss well and flip, then bake for another 15 minutes until the beans are a deep golden brown and crunchy. Let cool and munch. Easy chick peasy ya'll.

Dehydrated Snackings: Apple & Beet Chips

Because we all need a little munch in our life without added preservatives, you know? These recipes below are simple, crunchy, healthy, and totally addictive. The only problem we have with them, is how fast they seem to disappear from the pantry. Within moments, they’re just.. gone. 

Seasoning your chips is to your preference, but these recipes tend to lean toward a lil' sweet, and a lil' savory. If you're looking for a lot  of chew (like tough as leather), it's better to leave your chips in the dehydrator for a few hours less. For a crunchier bite, stick to our advised dehydrating time of about 12 hours.


Beet Chips


Ingredients:

 5 beets, I used golden and red
1/4 cup apple cider vinegar
1 tablespoon olive oil
1/4 cup water
Himalayan salt and pepper to taste


Method:

1. Mix together cider vinegar, oil and water. Set aside.

2. Slice the beets very thin. I used a mandoline for this.

3. Soak the sliced beets in the water mixture for about 10 minutes. You may have to toss to coat.

4. Spread on screens, sprinkle with salt and pepper. Dehydrate at 145 for 45 minutes, reduce heat to 115 and continue dehydrating for about 12 hours or until chips are crunchy. 

*Note: Don’t worry about beginning dehydration temp. The food never goes above 115 and it’s raw integrity is not compromised.


Cinnamon Apple Chips


Ingredients:

6-8 apples
5 tbsp lemon juice
1 tbsp maple syrup (optional)
2 tsp cinnamon


Method:

1. Slice the apples as thin as you can get them. The key tool to have to make a wafer thin, uniform, crisp apple chip is a mandolin.

2. In a bowl, combine apples, cinnamon, whatever spices, and lemon juice. Mix around so both sides of the apple rings are coated in the mixture. 

3. Place apple rings on mesh drying trays one at a time. Dry at 155°F for about 4 hours or until firm and crisp. Remove from trays, transfer to a wire rack and let cool completely. Serve immediately or store in an airtight container at room temperature for up to 3 months.

4. Embrace the smell of your kitchen. 


Raw Rosemary & Cayenne Flax Crackers

Recently we've stepped (more like ran towards head on) into a dehydrating frenzy. Not only because it gives us an abundance of snack attacks for super cheap, but this method doesn't destroy enzymes in your raw nutrient dense food. WIN WIN here. This is a recipe with flax seeds and chia seeds, so they are very rich in Omega 3s, vitamin E, protein, B vitamins, manganese, magnesium, and fiber. With just a few other basic ingredients- raw garlic and fresh rosemary- you don't need much more than a pinch of salt to have an insanely flavorful cracker.

Take this nourishing and satisfying little snack with you camping or on a long drive and you'll be happy even if you are if the middle of nowhere.


Ingredients:

1/2 cup flaxseeds
1/2 cup hulled hemp seeds or sesame seeds 3 tbsp hulled flax
1 tbsp chia
1/4 cup fresh rosemary
1 tablespoon fresh minced garlic
1/2 tsp cayenne
1/2 c water

*Various herbs can be used to tune them to your taste. 

Method:

1. In a medium bowl mix together all ingredients and let sit for 30 minutes to let the chia and flax gelatinize. 

2. If you have a dehydrator spread mixture thinly and evenly on the liner tray. Alternatively line a baking sheet with parchment paper and set your oven to the lowest setting, leaving the oven door cracked open to help keep the temperature below 115 degrees Fahrenheit. dehydrate or bake in oven for 4 to 6 hours until crispy.

3. Break into cracker size pieces.

*Note: they can be preserved in the fridge for about two weeks and in the freezer for about two months.


Something Like Shakshuka

Cari Bernard is a whiz around her biddy Brooklyn kitchen- navigating between stove top, cutting board, sink and fridge- while I unhelpfully watch, too afraid to break her breakfast rhythm. I was lucky enough to share this morning meal with Cari just a few weeks ago, and she's been kind enough to share it with you! Stay tuned to Bloom for more freestyle food fix-ups from Ms. Cari B​, and in the meantime be sure to check out her site, Cari B Cooks.

Shakshuka is often seen as an Israeli breakfast food, but in fact it can be traced to many different cultures.  It just happens to be a wonderful jumping off point for a hearty breakfast, easy to cobble together with common pantry items.  This freestyle shakshuka doesn’t need to be made with mushrooms and escarole, that’s just what I had on hand that day. Onions and garlic are pretty key though, as is some sort of spiceiness.  The addition of avocado on the bread adds healthy fat, and helps to temper the acidity of the tomato. 

Serves 2-3


Ingredients:  

3 large eggs
5-7 button mushrooms
1/3 of a head of escarole
1/2 medium onion
2-3 garlic cloves
About 1-2 cups canned crushed tomatoes or tomato puree
Olive oil
Salt & black pepper to taste
Pinch of fennel seeds
Large pinch of crushed red pepper
Pinch of garlic powder
Marsala wine
Parsley
Avocado
Crusty bread

**large skillet with some depth to it


Method: 

1. Chop vegetables. 

2. Heat skillet over medium-high heat with oil and spices, add onion and garlic and sautee until soft.  Add mushrooms and sautee, splash with Marsala and cook down.  Add escarole and sautee until wilted. Remember to season as you go. 

3. Add enough tomato so that you have a decent mixture of tomato and vegetables that won’t reduce too far and still provides a substrate to “boil” your eggs in without burning on the bottom.  Allow tomato to heat until bubbling. 

4. Make three depressions in mixture and crack an egg into each one.  Cover skillet, reduce heat a touch, and cook until eggs are to your desired doneness. 

5. Drizzle with olive oil and season to taste.  Toast bread slices if not fresh, spread with avocado, a little bit of salt and cover generously with scoops of shakshuka.  Sprinkle with chopped parsley.


Marina's Pear Butter

Local guru of all things canned, jellied, and pickled, Marina Mertz was kind enough to let us in on her latest project, pear butter. We got the privilege to interview her on the her favorite kitchen tools, preferred produce to preserve, and of course the recipe to the delicious pear butter- worthy of eating straight out the jar.

​Oh, and did we mention that when this gal isn't busy whipping up something delicious, she's running her own business producing beautifully handcrafted waxed canvas bicycle bags? I know, dream girl. So stay tuned for more recipes, projects, and pro tips from Marina.​

What started your explorations in canning?

I attended a beginners class on canning at a sustainable living conference in 2008. This armed me with the knowledge to start canning but really the adventure began much earlier when I first got interested in cooking, canning is a natural extension of being in love with the kitchen and good food. 

Where do you source the produce for your canning? Do you grow anything yourself?

I mostly source my produce from friends fruit trees or u-pick farms, my garden right now is a little small to support canning but hopefully as the fruit trees I have planting grow I will be canning more of my own produce. Most people are more than winning to share fruit especially if they know they will get jam out of it!

What are some of your favorite fall canning projects?

I mostly can in the spring/summer, which is when tomatoes, berries, figs, grapes and pears are in season. Pears and grapes are at the very end of summer and canning them always signifies the beginning of fall for me.  

What is your favorite tool in your kitchen? In your home?

Can I pick more than one? A sharp knife is a must, my favorite knife is one made by Will Manning an amazing blacksmith. I also have been known to forget how to cook if I don't have cast iron and a gas range.

What is your favorite season?

Fall! The feelings of nostalgia, hope and potential always run strong during the brisk months. It also if when leafy greens come back into season and who doesn't love kale and arugula? 

What advice would you give to novice canners/preservers out there?

Take a class, read some books arm yourself with knowledge and then experiment. Just do it. Learn what botulism is and then don't be scared of it. Be safe. Get a jar lifter. Study candy making a little and learn what sugar does at different stages of heat. Learn how pectin works and why. You basically can't fail, even if none of your jars seal and the jam is to sweet you can always just refrigerate it and make jam bars, or if it doesn't set and is too runny label is a fruit syrup and have a magnificent cocktail. Always ask for the jars back!


Ingredients:

Sand Pears
Pectin
1/2 cup Raw Sugar Cane
Lemon Juice
Spices (optional): ginger, cardamon, star anise


Method:

1. Chop up sand pears whole, the stems/seed/peel - have pectin which will help it thicken.

2. Cook down with just enough water to allow the pears to not burn, I added star anise at this point.

3. When pears are soft, run them thru a food mill or sieve to remove any hard parts. 

4. Put back onto stove and add up to 1/2 cup of sugar per cup of pears, a tbs or so of lemon juice per cup and whatever spices you are using, ginger and cardamom are awesome. Cook down until it gets a jam like consistency and then can!

Vanilla Coconut Fig Rum Pops

Surviving summer in the south requires a handful of provisions, including but not limited to the following characteristics: icy, boozy, and fruity. One of the easiest ways to achieve this tasty trifecta is through the tried and true popsicle. It's essentially a portable piece of happiness. And for at least five months out of every year, the popsicle replaces an entire food group in the Bloom nutritional pyramid. 

We took advantage of the seasonally ripe fig trees, whole vanilla beans (rather than processed extract), and a half-used, unclaimed bottle of rum that we found in the kitchen. Combine those key ingredients with a few other basic fixings, and you're ready make the pops. Rocket ship popsicle molds are not required, but highly suggested.


Ingredients:

1 1/2 c vanilla almond milk
1 1/2 c coconut milk
1/5 c turbinado sugar
1 vanilla bean, or two tsp vanilla extract
5 figs
2 shots of rum, or liquor of choice


Method :

1. Slice the figs so they are rather thick, like the thickness of two quarters.

2. Seed the vanilla bean by pressing it flat against a cutting board and then slicing it in half. Using a butter knife, slide it across the inside of each half, scraping out the seeds.

3. Add the coconut milk, almond milk, vanilla and sugar to a medium sauce pan and warm the mixture over a low heat, just until the sugar is fully dissolved.

4. Transfer the mixture to a large measuring cup and let it cool in the refrigerator for about an hour.

5. Fill each popsicle mold with about an inch of the cream mixture and insert the popsicle sticks. Let set in the freezer for about an hour.

6. Divide the sliced figs amongst the molds and fill with the remaining mixture.

Place popsicles in the freezer until solid.


Homemade Vanilla Extract

After buying bottle after bottle of vanilla extract I got tired of running out so fast and spending the money.  The taste cannot even be compared to that of real vanilla, so I thought - why not make my own? Its takes about 8 weeks of patience, but the recipe is so simple and totally worth the wait. I bought whatever 80 proof liquor that was reasonably priced - for this recipe I used Smirnoff vodka along with a few splashes of E&J bourbon.

Your extract vessel must be clean, airtight and glass - for example: canning jars, the leftover bottle of vodka, recycled kombucha bottles.. anything of that nature. The photo below shows my vanilla before and after having been steeped for just a few months. Your vanilla will darken in color after just one week. 

IMG_0337.jpg
IMG_0344.jpg

 Method Notes: The traditional time-frame to leave your beans soaking is 8 weeks before use, but as with wine, the longer it ages the extract will continue to mature. The alcohol will fade and the flavor of vanilla will develop and strengthen. Trust your nose with this one, if it smells prominently like alcohol, it’s not ready. While some people remove the beans after the a certain amount of time and strain the liquid to have a smoother vanilla, I choose to leave my beans in. This way you can keep replenishing your infusion with more vodka as you run out.

When extract is ready, use it directly out of brewing jar for all your cooking and baking needs. Vanilla extract will keep for many months and year(s) stored at room-temperature out of direct sunlight. About every six months or so I’ll replace the vanilla beans so they continue to infuse the alcohol and give it that extra oomph. 

This liquor infusion got me thinking of other liquor infusions to experiment with: cucumbers, mint, blackberries, edible flowers, herbs, spices.. there’s a whole world of liquor infusions out there to get flavorful on.


Ingredients: 

1 liter of good vodka
8 vanilla beans
1 pt of brandy or dark rum
1/2 cup honey (shoot for locally made or raw honey) 

Method: 

1. Using a sharp knife, slice your vanilla beans down the center lengthwise, stopping 1 inch from one end. Inside the beans you will notice the vanilla “caviar”. Scrape some of  the caviar out of your beans and place in the bottle you’ll be using to store your extract. Rule of thumb: 5 beans per 8 ounces alcohol.

2. Pour in your brandy, honey and then vodka over the beans to nearly the top of the bottle, about 95% full. Seal bottle, shake vigorously for about 30 seconds, and set in a corner on the counter top, shelf, or safe place out of direct sunlight, where extract will stay for two months. Once a week shake the jar for about 10 seconds.


Wild Blackberry Lemon Scones


Follow Bloom babe Elizabeth as she explores the North Florida countryside, picking wild blackberries, hanging out with cute cats and pups, and using her loot to bake a delicious batch of (vegan) blackberry lemon scones. 


Ingredients:

8 Tb of melted coconut oil
1 1/2 c blackberries
1/4 cup sliced almonds
1/2 cup almond milk (or use regular milk if you'd like)
1/2 cup almond yogurt
2 cup all-purpose flour, plus more for dusting the work surface
1/2 cup sugar, plus extra for sprinkling
2 tsp. baking powder
1/4 tsp. baking soda
1/4 tsp. salt
1/4 lemon zest + juice


Method:

1. Whisk together the almond milk, coconut oil, and almond yogurt in a medium bowl. In another bowl, combine the flour, ½ cup sugar, baking powder, baking soda, salt and almonds in a medium mixing bowl. Whisk to combine.

2. Add the milk-yogurt-oil mixture to the dry ingredients and fold in blackberries and lemon with a spatula just until combined.

3. We used a cast iron scone mold, but if you cant finagle one of those you can just roll the dough into a 12-inch square. Using a sharp floured knife, or a sharp dough scraper/chopper, cut the circle into 8 equal triangles (like pie wedges). Transfer to a parchment lined baking sheet.

4. Lightly sprinkle the tops of the scones with sugar and more sliced almonds. Bake until the tops and  bottoms are golden brown, 18-25 minutes. Transfer to a wire rack and let cool at 10 minutes before serving. If you can wait!